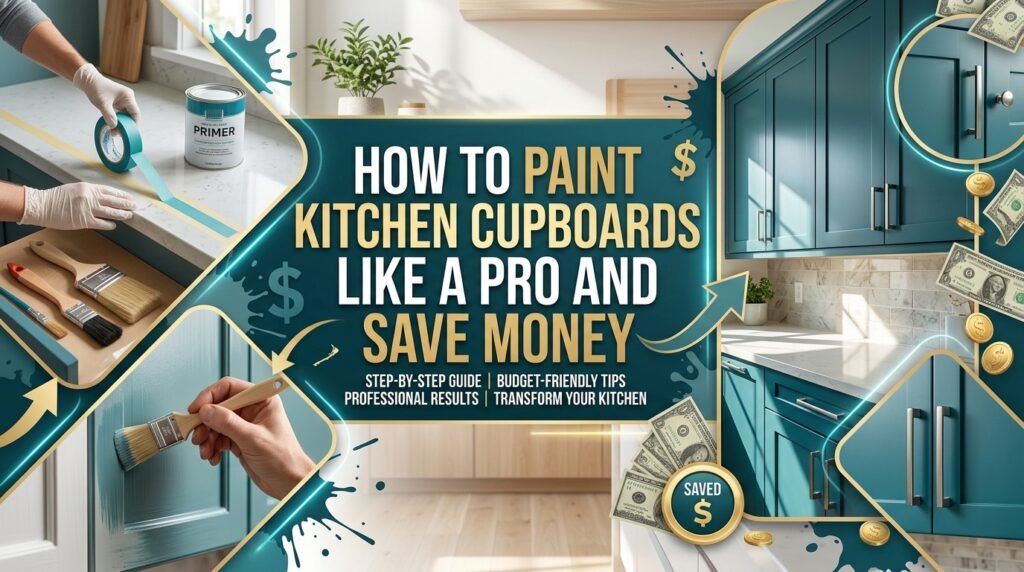
You don’t need a full refit to get a fresh kitchen. In most homes, the doors and boxes are fine. They just look tired. If you learn how to paint kitchen cupboards, you can change the whole room for a fraction of the cost.
This how to paint kitchen cupboards approach works for UK and US kitchens. It suits small flats, big family homes, and rental-friendly upgrades. Done right, how to paint kitchen cupboards gives you a smooth, tough finish that looks professionally fitted.
The best part is the savings. A weekend of smart prep and careful coats can beat a pricey renovation. Stick with this how to paint kitchen cupboards method and you’ll get that clean, modern look without draining your wallet.
Should You Paint or Replace?
If your doors still close well and the frames feel solid, a kitchen cupboard makeover makes sense. Most people replace units because the colour looks dated, not because the cupboards are broken. Painting fixes that fast. It also lets you update handles and hinges later without any waste.
However, painting won’t rescue everything. If laminate is peeling in sheets, if MDF has swollen edges, or if water damage has turned panels spongy, replacement might be cheaper long term. In those cases, you can still repaint some parts, but you’ll fight the surface forever. A good rule is simple: if the structure is strong, repaint kitchen cupboards. If the structure is failing, repair or replace first.
Here’s a quick money reality check. In a small UK kitchen, replacing doors and fitting can cost far more than paint and prep. In the US, the labour for replacement often outweighs the materials. Painting usually lands in the “smart upgrade” zone. As one decorator likes to say, Quote: You pay for prep once, but you enjoy the finish for years.
Choose Your Look Before You Lift a Brush
Start with the vibe you want. Bold dark colours can look expensive, but they show dust and chips sooner. Soft whites and warm greiges feel clean, but they can look flat if the finish is wrong. Spend ten minutes choosing kitchen cabinet paint colours that work with your worktops and floor. A quick trick helps: hold colour samples next to your busiest surface, usually the counter. If it looks good there, it will look good everywhere.
Next, decide the kitchen cupboard paint finish. This choice matters more than people think. A finish that’s too matte can mark easily near handles. A finish that’s too glossy can show every dent and brush line. The sweet spot for most homes sits between easy cleaning and forgiving sheen. The section on matte vs satin for kitchen cupboards will make that decision painless.
Finally, picture the “pro look”. Pros aim for straight door gaps, even sheen, and a surface that feels like one piece. You’ll get there with the right prep and the right pace. Rush it and you’ll end up Googling common mistakes when painting kitchen cupboards at midnight. Slow down and you’ll love the result.
How to Paint Kitchen Cupboards: Tools and Materials You Need
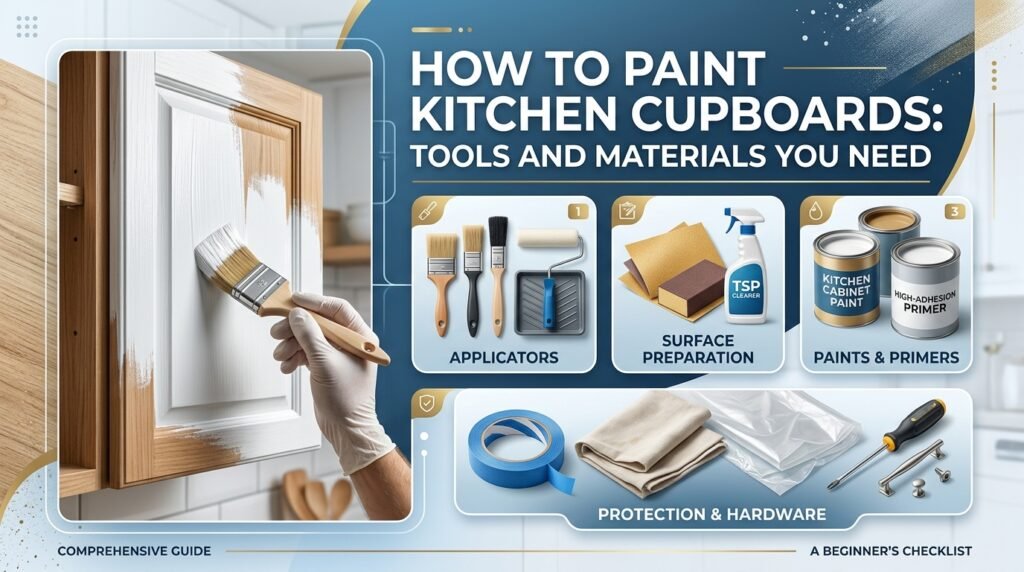
You don’t need a garage full of kit. You do need the right basics so the work stays tidy and the finish stays tough. For DIY kitchen cupboard painting, plan for a screwdriver or drill, a sturdy work surface, clean cloths, tape, a sanding block, a vacuum, and a decent tray. You’ll also want a small container for screws so they don’t vanish into the void behind the cooker.
Choosing applicators is where many people get stuck. If you paint cupboards with brush or roller, you can get a brilliant finish with less setup. Use a brush for edges and profiles, then roll flat areas for speed and consistency. If you paint cupboards with sprayer, you can get a factory-smooth look, but you must control dust and overspray. People often ask can I spray paint kitchen cupboards in a normal home. Yes, you can, but you need space, masking, and patience, or the kitchen will look like a foggy crime scene.
Paint and primer matter because kitchens get knocked, steamed, and wiped daily. Pick durable paint for kitchen cabinets that’s designed for woodwork, not walls. Then choose primer for kitchen cupboards based on your surface. A bonding primer grips glossy finishes. A stain-blocking primer stops tannin bleed on knotty wood. If you want the safest route, start with the best primer for kitchen cupboards for your material and top it with a cabinet enamel.
Prep products keep the finish from peeling. You’ll need a cleaner to degrease kitchen cupboards because cooking film builds up in layers you can’t see. You’ll also want filler. Even tiny dents show once paint levels out. Keep wood filler for cupboards on hand for repairs, plus a scraper for filling holes in cupboards neatly.
Use this simple table to avoid overbuying while still getting pro results.
| What you need | Why it matters | Budget pick | Pro pick |
| Cleaner | Helps clean cupboards before painting | Sugar soap | Degreaser concentrate |
| Abrasives | For sanding kitchen cupboards lightly | Sanding sponge | Quality block + papers |
| Primer | Strong base, better grip | Multi-surface | Bonding or stain-blocking |
| Paint | Tough top layer | Trim paint | Cabinet enamel |
| Applicators | Controls texture and marks | Foam roller | Microfibre roller + angled brush |
How to Paint Kitchen Cupboards: Prep Steps for a Flawless Finish
Prep feels boring, but it’s the real “pro” move. If you’re wondering how to prep kitchen cupboards for painting, think of it like painting your nails. If you skip the cleaning and smoothing, the polish chips fast. The same thing happens with cupboards, only bigger and more annoying.
Start by taking everything off. You should remove cupboard doors for painting so you can work flat and avoid drips. When people ask how to remove cupboard doors and hinges, the answer is simple: support the door with one hand, undo hinges slowly, and keep all screws together. Then do the most helpful step of all, which is organisation. Label cupboard doors and hinges so refitting takes minutes instead of hours. If you want the easy method, use tape and a marker. That’s how to label cupboard doors for easy refitting without confusion later.
Now get serious about cleaning. Kitchens hold invisible grease, especially near the hob and kettle area. Many finishes fail because people “wipe” instead of properly cleaning. Follow the logic in how to clean greasy kitchen cupboards before painting. Wash with warm water and a degreaser, rinse, then dry fully. This is where you truly degrease kitchen cupboards and finally clean cupboards before painting in a way that makes paint stick.
Once clean, repair dents and holes. Paint doesn’t hide damage. It highlights it. Use wood filler for cupboards for chips and worn corners. Smooth it after it dries. Then tackle filling holes in cupboards from old handles or hardware you’re replacing. Take your time here because these spots sit right at eye level.
Next comes the sanding debate. People often ask should I sand kitchen cupboards before painting. Usually, yes, but not always heavily. Most of the time you just need to dull the shine so primer grips. That’s sanding kitchen cupboards for adhesion, not sanding to bare wood. If you want the shortcut, you can paint cabinets without sanding in some situations, but only if you use the right bonding primer and the surface is stable. So, can you paint kitchen cupboards without sanding? Yes, but it’s a calculated choice, not a gamble.
Before you prime, protect the room. Tape off edges, cover floors, and shield appliances. This step sounds fussy, but it saves hours later. Mask and protect kitchen surfaces carefully, especially around hinges and inside corners where drips love to hide. At this point, you’ve done the key cabinet painting prep steps that separate a quick job from a lasting one.
How to Paint Kitchen Cupboards: Best Paint Types and Finishes
The paint that looks great on a living room wall won’t survive a busy kitchen. That’s why people keep asking what paint is best for kitchen cupboards. The answer is simple: use a paint made for trim, cabinets, or woodwork. It dries harder, it resists scuffs, and it cleans without turning sticky.
When you choose the best paint for kitchen cupboards, match it to your lifestyle. If you cook daily, wipe doors often, or have kids who treat cupboards like climbing frames, pick a tougher enamel. This is how you get a how to paint kitchen cupboards for a durable finish result that stays looking good.
Surface type changes everything. If you need to paint laminate kitchen cupboards, you must focus on grip. Laminate is smooth and non-porous, so paint needs help to hold on. The safest method follows how to paint laminate kitchen cupboards properly: clean well, scuff lightly, use bonding primer, then apply thin coats. MDF needs different care. If you paint MDF kitchen cupboards, you must seal edges because raw MDF drinks moisture like a sponge. For edge safety, follow how to paint MDF kitchen cupboards without swelling by sealing any exposed areas before your main coats.
Now choose your finish. People ask what finish is best for kitchen cupboards because it affects both style and cleaning. Satin usually wins for most homes because it wipes easily without looking plasticky. Still, the choice depends on the look you want and how much wear your kitchen gets. The matte vs satin for kitchen cupboards decision becomes easier when you think about fingerprints. Matte hides small dents. Satin hides less texture, but it cleans faster.
Some people add extra protection. A top coat can help, but only if it matches your paint system. If you go that route, choose the best top coat for painted kitchen cupboards that won’t yellow or peel. Many modern cabinet paints don’t need it, but high-traffic homes sometimes benefit from the extra barrier.
How to Paint Kitchen Cupboards: Step-by-Step Painting Method
If you want how to paint kitchen cupboards step by step, this is the flow that keeps things neat and predictable. Work on doors first because they show the most. Then paint frames and boxes while doors dry. Keep the kitchen usable by doing one run at a time, rather than stripping the whole space in one go.
Prime first. A good primer evens out repairs, improves grip, and reduces the number of top coats. Many people ask do I need primer for kitchen cupboards. In most kitchens, yes, you do. Primer is like a seatbelt. You don’t notice it until you need it. Apply primer thinly and smoothly, then let it dry fully before paint. If you see rough spots, lightly sand and wipe away dust.
Now paint the doors. For flat areas, the rolling method is fast and clean. If you’re searching for how to paint kitchen cupboards with a roller, use a short-nap microfibre roller and don’t overload it. Roll in one direction, then lightly “lay off” to reduce texture. For edges, corners, and grooves, you’ll need a brush. If you’re looking up how to paint kitchen cupboards with a brush, use an angled brush, load it lightly, and keep a wet edge so strokes blend instead of stacking.
This is where the right tools matter. Use the best roller for painting kitchen cupboards for smooth panels and the best brush for painting kitchen cupboards for detailed edges. When you combine them well, you naturally paint cupboards with brush or roller in a way that looks consistent.
If you prefer spraying, prepare properly. Spraying gives a sleek finish, but it punishes sloppy masking. You can absolutely paint cupboards with sprayer, but you must protect every surface. People who ask can I spray paint kitchen cupboards often forget the drying space. Plan drying racks or a clean room where dust won’t settle into wet paint.
Next comes the coat count. Most cabinets need two top coats, sometimes three, depending on colour and paint type. That’s why people ask how many coats for cupboards and how many coats of paint on kitchen cupboards. In real homes, two thin coats beat one thick coat every time. Thick coats sag, they stay soft longer, and they show lines.
To keep the finish smooth, sand lightly between coats once the paint is dry. This is the secret behind a smooth finish on kitchen cupboards. It also helps avoid brush marks on cupboards because each coat levels better. If you want the practical answer to how to get a smooth finish on kitchen cupboards, it’s this: light sanding, clean dust, thin coats, and steady drying.
Brush marks worry almost everyone. The cure is technique and timing, not magic paint. For how to avoid brush marks on kitchen cupboards, don’t press hard, don’t overwork drying paint, and don’t paint in extreme heat. If you keep asking avoid brush marks on cupboards in your head while you paint, slow down. Use fewer strokes. Let the paint level on its own.
Once doors are done, paint the frames. Use the same paint system for consistency. Keep coats thin near hinge areas so doors close properly later. When everything looks even, step away. This is the moment many people ruin their work by “fixing” tiny spots that would have levelled out on their own.
How to Paint Kitchen Cupboards: Drying, Curing, and Aftercare Tips
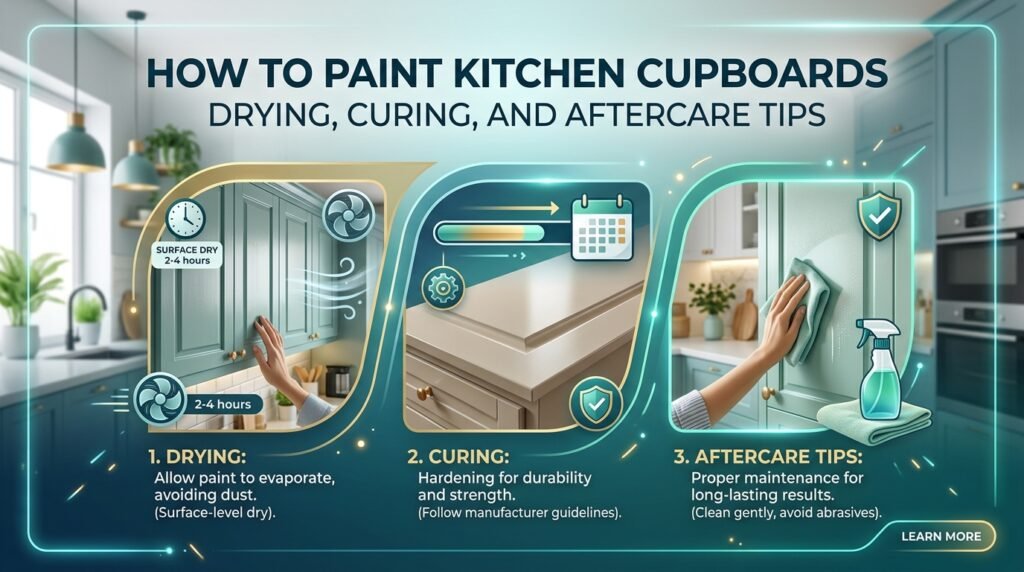
Drying and curing are not the same thing, and this is where most DIY jobs go wrong. Paint can feel dry in a few hours, but it may still be soft underneath. That’s why you need to understand the drying time for painted cupboards and the curing time for cabinet paint before you refit everything.
If you’re asking how long does kitchen cupboard paint take to dry, the honest answer depends on humidity, temperature, and paint type. Many cabinet paints need overnight drying between coats. If you’re asking how long does cabinet paint take to cure, expect days, sometimes a couple of weeks, for full hardness. During that period, treat your cupboards gently. Avoid harsh cleaners and don’t scrub sticky spots. Use a damp cloth and mild soap instead.
Refitting should feel calm, not chaotic. Because you already took time to label cupboard doors and hinges, putting everything back becomes a simple matching game. Refit hinges, align doors, and adjust until gaps look even. Add soft pads if doors tap loudly. This tiny upgrade stops paint chips around the contact points.
Protecting the finish is easier than repairing it. If you want how to protect painted kitchen cupboards, keep a few habits. Wipe spills quickly, avoid abrasive pads, and don’t hang wet towels over doors during the cure period. If you do get a chip, don’t panic. Keep leftover paint for easy repairs. Learning how to touch up painted kitchen cupboards is simple: clean the spot, feather the edges lightly, then dab thin layers until it blends.
Finally, make it last. If you want how to make painted kitchen cupboards last longer, focus on the high-touch areas. Handles, corners, and the bin cupboard take the most hits. Consider stronger hardware, teach kids to use handles, and avoid slamming doors. These small habits keep your finish looking new for years.
Common Mistakes That Waste Time and Money
Most problems come from rushing prep. People skip cleaning, paint over grease, then blame the product. That’s why common mistakes when painting kitchen cupboards often start with poor degreasing. Another big mistake is painting in the wrong conditions. High humidity slows drying and can leave paint tacky, so doors stick.
Using the wrong paint is also a classic trap. Wall paint looks fine at first, but it scuffs easily and can feel rubbery after cleaning. That’s why choosing the best paint for kitchen cupboards and the right primer for kitchen cupboards matters so much. Finally, don’t hang doors too soon. If you ignore curing time, hinge pressure can leave dents that never fully disappear.
Quick Reference Table: Pick Your System Fast
| Cupboard type | What to use | Key focus |
| Solid wood | primer for kitchen cupboards + cabinet enamel | Block stains, sand lightly |
| Laminate | Bonding primer + enamel | paint laminate kitchen cupboards with strong adhesion |
| MDF | Sealer + primer + enamel | paint MDF kitchen cupboards with sealed edges |
FAQs
How long does the whole job usually take?
Most how to paint kitchen cupboards jobs take a weekend to paint. Full curing takes longer, so treat doors gently.
Do I really need to take the doors off?
Yes, it helps a lot. How to paint kitchen cupboards looks neater when doors lay flat and you avoid drips.
What should I clean with before I start painting?
Use a strong degreaser or sugar soap. How to paint kitchen cupboards works best when surfaces feel squeaky clean.
Is sanding always required for good results?
Light scuffing helps paint grip. How to paint kitchen cupboards can work without sanding if you use bonding primer.
What paint finish looks best in a busy kitchen?
Satin is a safe choice for most homes. How to paint kitchen cupboards looks modern and wipes clean easily.
How many coats should I apply for solid coverage?
Two thin coats usually win. How to paint kitchen cupboards looks smoother with light layers instead of thick paint.
How do I stop marks and chips after painting?
Let paint cure fully before heavy use. How to paint kitchen cupboards lasts longer with gentle cleaning and soft-close pads.
Conclusion
If you want a kitchen that looks new without the big spend, how to paint kitchen cupboards is one of the smartest upgrades. It changes the whole space fast. It also lets you choose colours and finishes that suit your life.
Prep is the make-or-break step. Clean well, label parts, fix damage, then paint in thin coats. When you follow how to paint kitchen cupboards carefully, the result feels smooth, strong, and properly finished. Be patient with drying and curing. That patience stops chips, sticking, and fingerprints. Stick with this how to paint kitchen cupboards method and your cupboards can look professionally done for years.
Learn how to change a kitchen tap quickly without a plumber with simple steps, easy tools, and smart tips that save time.