Changing a tap can feel like a bigger job than it really is. The good news is that how to change a kitchen tap quickly without a plumber is much easier than most people think. If your old tap drips, looks worn out, or feels loose, you can sort it yourself with a little patience and the right steps.
Many people search for how to change a kitchen tap quickly without a plumber because they want to save money and avoid waiting for help. That makes sense. A tap swap is one of those home jobs that looks tricky at first, yet becomes quite manageable once you know what to do.
This guide explains how to change a kitchen tap quickly without a plumber in clear and simple English. You will learn what tools to use, how to remove the old unit, how to fit the new one, and how to avoid common mistakes. By the end, how to change a kitchen tap quickly without a plumber will feel far less intimidating.
Why You Might Need to Change a Kitchen Tap
A kitchen tap works hard every day. You use it for washing up, cooking, filling kettles, rinsing fruit, and cleaning the sink. Over time, even a decent tap starts to show its age. It may drip at night and drive you mad. It may wobble when you turn it on. It may look dated and spoil the rest of the kitchen. In many homes, a simple kitchen tap replacement solves all of these issues in one go. A fresh tap improves the way your sink looks and works. It can also cut down the hassle that comes with constant leaks, stiff handles, and poor water flow.
Sometimes people try to repair the old tap again and again. That works for small issues. However, there comes a point when it makes more sense to replace kitchen faucet parts with a full new fitting. If the body is corroded, the seal keeps failing, or the handles feel rough and worn, a complete kitchen faucet installation is often the smarter move. Think of it like replacing worn shoes. You can fix them temporarily for a bit. Yet once the sole starts giving up, a new pair saves time and stress.
For many households, the real trigger is a leak. If you need to change kitchen faucet fittings because the old one will not stop dripping, it is better to act sooner rather than later. Even a small leak wastes water and leaves marks around the base. In a busy family kitchen, that drip can turn into a real nuisance. Learning how to change a kitchen tap quickly without a plumber gives you a useful skill that pays off straight away.
Choosing the Right Replacement Tap
Before you touch a spanner, make sure you buy the right tap. This part matters more than people expect. A tap can look perfect in the box and still be wrong for your sink. You need to check the number of tap holes, the mounting style, the hose length, and the connector size. If you plan to install a kitchen tap that does not match your setup, the whole job becomes harder than it needs to be. A little checking at the start saves a lot of grief later.
For most homes, a kitchen sink tap replacement falls into one of two groups. You either have a mixer tap with one combined spout or separate hot and cold taps. Many modern homes choose a mixer design because it looks neat and feels easy to use. That is why DIY kitchen tap replacement often means swapping one mixer for another. If your current tap sits on the sink or worktop, you probably have a deck mounted kitchen tap. That is one of the most common styles in both the UK and the US, so finding a replacement is usually simple.
If you are working with a mixer model, check whether you need a kitchen mixer tap replacement with flexible tails already attached. Many new taps include them. Some do not. That small detail can slow you down if you miss it. A good kitchen tap fitting guide always starts with compatibility. In plain terms, the best tap is the one that fits your sink, suits your pressure, and matches the plumbing you already have. Once you know that, the rest of how to change a kitchen tap quickly without a plumber becomes far more straightforward.
Tools You Need for How to Change a Kitchen Tap
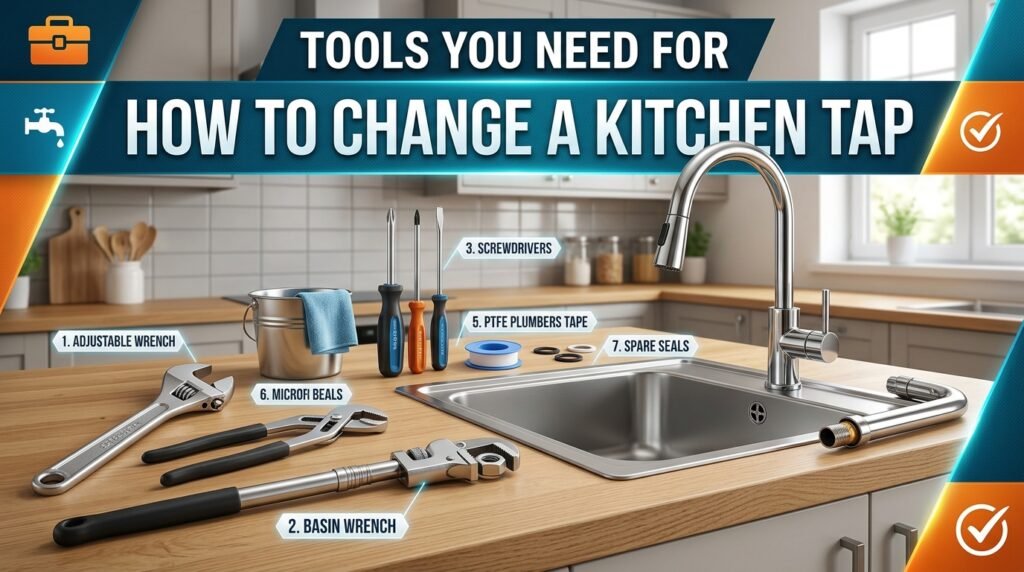
When people look up tools needed to change a kitchen tap, they often imagine a giant pile of specialist gear. In reality, you only need a few basics. Most jobs call for an adjustable spanner, a basin wrench, a screwdriver, a bucket, some old towels, and PTFE tape. A torch also helps because the space under a sink is rarely bright or roomy. If the old nuts are rusty or awkward, a little penetrating oil can make life much easier. This is the heart of kitchen tap plumbing. You do not need a van full of kit. You just need the right few tools within reach.
A basin wrench deserves a special mention because it makes under-sink work far less frustrating. Tap fittings often sit in a cramped spot where your hand barely fits. That is why people get stuck during new kitchen tap installation. They can see the nut but cannot grip it properly. A basin wrench reaches up into that tight gap and turns the fixing without forcing your wrist into a pretzel. It is one of those tools that feels unnecessary until you use it once. Then you wonder why you ever struggled without it.
Below is a simple guide to the most useful tools for how to change a kitchen tap quickly without a plumber.
| Tool | What it does | Why it helps |
| Adjustable spanner | Loosens and tightens fittings | Works for different nut sizes |
| Basin wrench | Reaches tap nuts under the sink | Ideal for tight spaces |
| Screwdriver | Removes clips and brackets | Handy for small fittings |
| Bucket | Catches leftover water | Keeps the cupboard dry |
| Towels or cloths | Protects surfaces and mops drips | Stops mess spreading |
| PTFE tape | Helps seal threaded joints | Reduces minor leaks |
| Torch | Lights dark spaces | Makes the job easier to see |
If you gather these items first, tap replacement at home feels smoother and far less chaotic. It also helps you stay calm. Nothing drags a DIY job out like crawling away mid-task because you forgot one small tool.
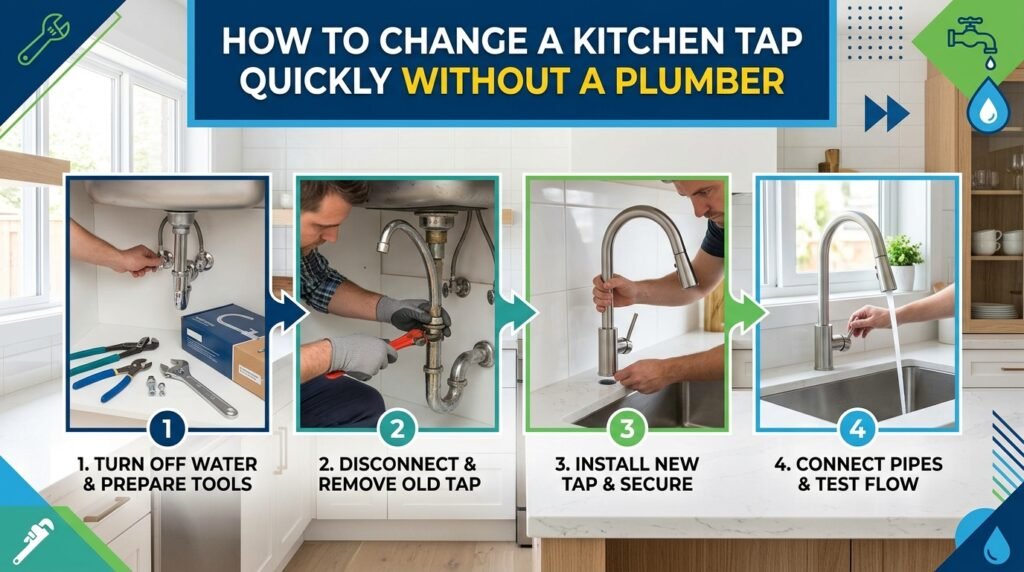
How to Change a Kitchen Tap Step by Step
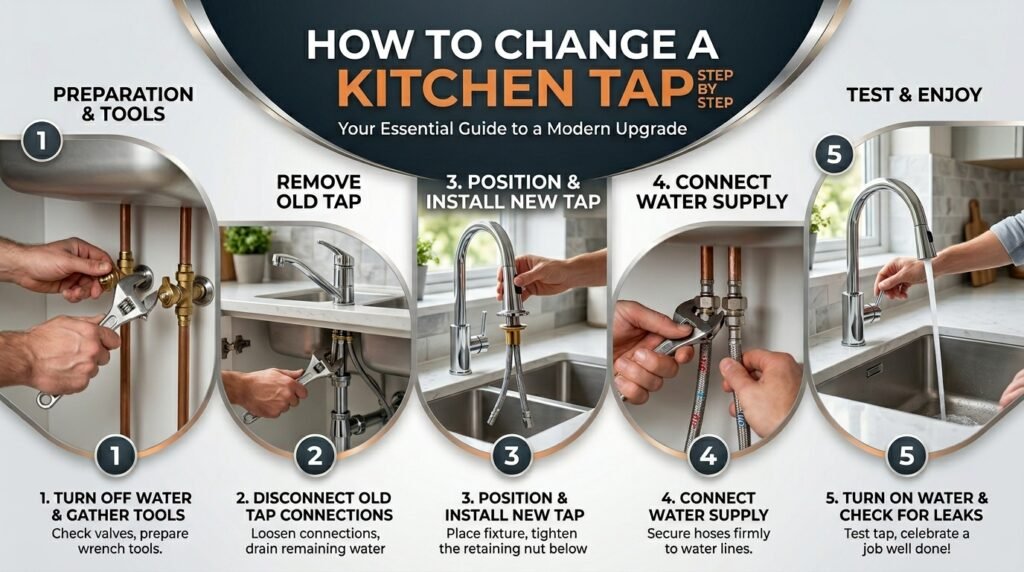
The quickest route is also the calmest one. Begin by switching off the water supply. Many sinks have isolation valves under the basin. Turn them off first. If your setup does not have them, shut off the main supply. Then open the tap to make sure no water is still coming through. This first check matters because it prevents the kind of splashy surprise nobody wants. If you are learning how to change a kitchen tap step by step, this is where it begins. Water off first. Always.
Next, clear out the cupboard under the sink. Take out cleaning bottles, bins, and anything else in the way. Place a bucket underneath the tap area and lay down a towel. Then move on to how to disconnect kitchen tap water lines. Use your spanner to loosen the connectors slowly. A little water will almost always spill out, so let it drain into the bucket. Keep the fittings safe if you might need them later. At this stage, the job starts to feel real. You have moved from planning to action.
Now comes how to remove an old kitchen tap. This is often the fiddliest part, especially if the old fittings are rusty. Use the basin wrench to loosen the mounting nut underneath. If it will not move, add a little penetrating oil and give it a moment. Once the nut and any bracket come free, lift the tap out from above. That is your old kitchen tap removal done. Clean the area well before you fit anything new. Wipe away grime, old sealant, and limescale so the new base sits flat and firm.
The next stage is how to install a new kitchen tap. Feed the hoses through the sink hole. Set the tap in place. Make sure it faces the right way before tightening anything underneath. Then secure it with the fixing kit. This part sounds easy, yet alignment matters. A tap that looks straight from above may twist slightly while you tighten it below. Check it twice. If you want to fit a new kitchen tap neatly, do not rush this moment.
Once the body is fixed, reconnect the water lines. This is where many people learn how to replace a kitchen mixer tap or how to replace a kitchen sink tap with more confidence than they expected. Tighten the connections firmly, though do not force them. Turn the water back on slowly. Run the tap for a minute. Check underneath with a dry hand or tissue. If you feel moisture, tighten gently and test again. This is also the point where you learn how to tighten a newly installed kitchen tap if the base feels loose. A small adjustment usually sorts it.
If you follow this order, how to change a kitchen tap quickly without a plumber becomes a job of method rather than guesswork. In most cases, once you have done it once, you will never look at a dripping tap the same way again.
Working with Different Tap Styles
Different taps need slightly different handling. A standard single-lever tap is often the easiest. A pull-out spray tap adds an extra hose, so you need to guide it carefully through the sink opening and make sure the weight under the sink hangs freely. A bridge-style tap with separate controls may take longer because there are more parts to line up. Still, the basic idea stays the same. You disconnect the old unit, clean the area, and install the new one securely.
If you need to change a kitchen mixer tap, check the hot and cold connections before you tighten everything fully. It sounds obvious, yet it is surprisingly easy to cross them if you are working in a tight cupboard. The same goes for kitchen sink faucet replacement jobs in US homes where connector types can vary. Take a moment to match the fittings properly. That one pause can save you taking the whole lot apart again.
A lot of beginners search for how to replace a kitchen tap easily because they worry about hidden complications. In truth, the easiest jobs are simple like-for-like swaps. If your new model matches the size and style of the old one, the process is usually smooth. That is the best way to change a kitchen tap. Do the prep first, buy the right tap, and keep the new fitting close by so you can compare parts as you go.
Simple Advice for First-Time DIY Tap Changes
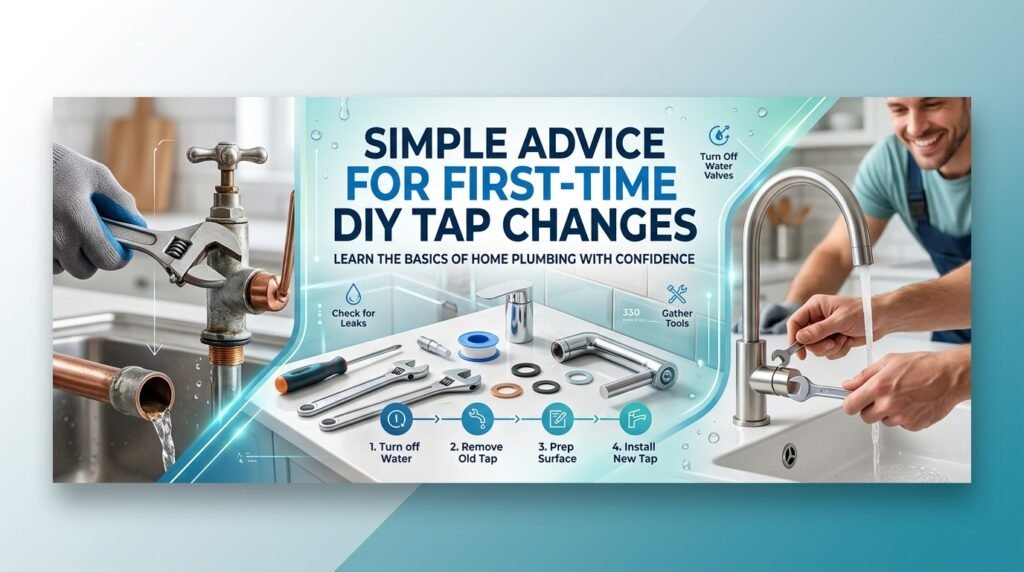
There is a reason the phrase easy DIY kitchen tap replacement gets searched so often. People want a clear win. They do not want jargon or guesswork. They want a plain method that works. The good news is that a first-time tap change is very doable when you break it into stages. Read the instructions before starting. Lay out the parts in order. Take a photo of the old setup before you disconnect anything. That little photo acts like a safety net when you reconnect the new hoses.
This is where a beginner guide to changing a kitchen tap really helps. New DIYers often think speed matters most. It does not. Steady hands beat rushed ones every time. If you move too fast, you can thread a connector badly, misalign the base, or forget a washer. Think of it like making tea for guests. The fastest brew is not always the best one. A tiny bit of care makes the result much better.
For people wondering how to swap out a kitchen tap, the smartest habit is to check each stage before moving on. Before reconnecting hoses, make sure the tap sits straight. Before turning the water back on, make sure the nuts feel snug. Before packing your tools away, test for drips again. These checks do not add much time, yet they make how to fix and replace a kitchen tap far less stressful.
Common Mistakes to Avoid in How to Change a Kitchen Tap
The biggest mistake is starting before the water is fully off. It sounds basic, yet it happens often. Someone turns a valve halfway, assumes it is fine, and then loosens a fitting. Water sprays. Towels go everywhere. Stress levels shoot up. In a simple home job, that kind of moment can make everything feel harder than it is. If you remember one rule from common mistakes when changing a kitchen tap, let it be this one. Test the tap after shutting the water off. Do not just assume.
Another common problem is buying the wrong tap. A new model may look brilliant online, though if the connectors do not suit your pipes or the base does not cover the old mark, the job becomes awkward. This matters when people try kitchen tap repair and replacement without checking measurements first. A smart purchase saves more time than any shortcut ever will.
Overtightening is another trap. People worry that a fitting will leak, so they keep turning. That can damage threads, crush washers, or even crack a part. The result is the exact issue they hoped to prevent. A snug fit is usually enough. If you need to change a leaking kitchen tap, gentle precision beats brute force every time. The same goes if you want to replace sink tap fittings cleanly. Tight is good. Forced is not.
The last mistake is skipping the final test. Run both hot and cold water. Look underneath. Dry the joints and check again after a few minutes. Some tiny drips take a moment to show. If you miss them, the cupboard under the sink becomes damp and musty before you notice. The smartest DIYers do one last patient check because they know that careful endings matter just as much as strong starts.
Troubleshooting After Installation
Sometimes the tap is in place and still something feels off. The most common issue is a slight wobble at the base. If that happens, the fixing nut underneath probably needs another careful turn. This is where learning how to tighten a newly installed kitchen tap saves the day. Support the tap from above so it stays aligned while you tighten below. Even a slight adjustment can make a big difference.
A second issue is a slow drip from one connection. If that happens, turn the water off again and inspect the joint. Make sure the washer sits properly. Check the thread. If needed, reseal and reconnect. This is part of learning how to change a kitchen faucet without a plumber in a real-world way. Not every job goes perfectly in one smooth sweep. Sometimes DIY is about making a tidy correction rather than starting over.
People also ask how to change a leaking kitchen tap when the new unit still drips after fitting. In that case, the problem may not be the tap body at all. It could be a loose connector, trapped debris in the aerator, or a cartridge fault. Start with the simple checks first. Most problems have simple causes. That practical mindset is what makes how to change a kitchen tap quickly without a plumber such a useful skill.
UK and US Homes: What Changes and What Stays the Same
This guide works for both UK and US readers because the core process stays much the same. You turn off the water, remove the old fitting, clean the area, fit the new tap, reconnect the lines, and test for leaks. That sequence rarely changes. What does vary is the type of connector, the size of fittings, and sometimes the placement of isolation valves. In US homes, supply line fittings may differ from those in many UK kitchens. That is why a quick compatibility check matters before you buy.
If you are tackling how to replace a kitchen mixer tap in the UK, flexible tails and compression fittings are common. In US homes, braided lines are very common on modern taps. None of this makes the job harder. It simply means you should check the box contents and your sink setup before starting. Once you do that, how to install a new kitchen tap feels much the same on either side of the Atlantic.
How Long It Takes and What It Costs
Many people ask how long it takes to change a kitchen tap. For a straightforward swap, a confident beginner may finish in one to two hours. If the old fittings are seized or the cupboard is awkward, it may take longer. That is normal. Tight spaces slow everyone down. The trick is not to panic when a nut refuses to move. Pause, use the right tool, and work through it.
Another common question is the cost to change a kitchen tap. The answer depends on the tap you choose and whether you already own basic tools. Budget taps can be very affordable. Designer taps cost more. Even so, doing the work yourself often saves a fair amount compared with paying for labour. That is one reason so many people want to learn how to change a kitchen tap quickly without a plumber. The saving is not just money. It is time, too. You do not need to wait for an appointment or rearrange your day.
A simple example makes this clear. Imagine a tap starts leaking on Friday evening before guests arrive on Saturday. If you know how to change a kitchen tap quickly without a plumber, you can solve the problem that same night or the next morning. That is practical value. It turns a headache into a manageable task.
Why Learning How to Change a Kitchen Tap Saves Time and Money
This skill pays off faster than many DIY jobs. First, it saves labour costs. A plumber earns that fee for good reason, though not every household job needs one. When you can handle kitchen sink tap replacement on your own, you keep that money in your pocket. Second, it saves time. A leaking tap rarely chooses a convenient moment. Knowing what to do lets you act straight away.
There is also a confidence boost that comes with it. Once you complete one successful DIY kitchen tap replacement, other small plumbing tasks feel less daunting. You start to understand the logic of fittings, seals, and supply lines. The whole idea of kitchen tap plumbing becomes less mysterious. That confidence matters. It changes how you deal with little home problems in the future.
Most of all, it gives you control. Instead of staring at a drip and waiting for help, you know the process. You know how to remove an old kitchen tap, how to fit the replacement, and how to test it properly. That is why how to change a kitchen tap quickly without a plumber is such a valuable home skill. It is useful, practical, and easier than it first appears.
FAQs
Can a beginner do this job at home?
Yes, a beginner can learn how to change a kitchen tap with basic tools, simple steps, and a little patience.
How long does this usually take?
For most people, how to change a kitchen tap takes one to two hours, depending on space and old fittings.
What tools will be needed?
You need a spanner, basin wrench, screwdriver, bucket, and towel for how to change a kitchen tap safely.
Do I need to turn the water off first?
Yes, always turn off the water before how to change a kitchen tap or you could end up with a mess.
Is it cheaper than calling a plumber?
Yes, how to change a kitchen tap yourself can save money because you avoid labour charges and call-out fees.
What if the old tap is stuck?
If it is stuck, use oil and a basin wrench. That often helps during how to change a kitchen tap.
How do I know the new tap is fitted properly?
After how to change a kitchen tap, run water slowly and check every joint carefully to make sure nothing leaks.
Final Thoughts
Learning how to change a kitchen tap quickly without a plumber can save you stress, time, and money. It is one of those jobs that seems awkward until you break it into simple steps. Once you prepare well and use the right tools, the whole task feels much more manageable.
The real key to how to change a kitchen tap quickly without a plumber is patience. Turn the water off, work in order, and check every connection properly. If you do that, even a first attempt can go smoothly. Small details matter, yet the process is not as intimidating as it first looks. In the end, how to change a kitchen tap quickly without a plumber is a skill worth having. It helps you deal with leaks faster and gives you more confidence at home. The next time your tap drips, wobbles, or looks tired, how to change a kitchen tap quickly without a plumber will feel like a practical fix rather than a big problem.
How to Fit a Kitchen like a pro with clear steps, exact measuring, and tidy finishing tips—save time, avoid costly mistakes.