Discovering a burst water pipe in the wall can be stressful. Water can seep into your home silently, causing wall plumbing problems and serious water damage. Knowing how to fix a burst water pipe in the wall quickly can save you time, money, and stress.
Many homeowners don’t realise that hidden pipe leaks are common. A small drip can turn into a major home plumbing emergency. Learning how to stop a pipe leaking inside the wall ensures you can act before the damage spreads. With the right guidance, tools, and plumbing repair tips, fixing a burst pipe doesn’t have to be complicated.
This guide will show you step-by-step how to handle a burst water pipe in the wall, from gathering the essential tools to performing a temporary fix for burst pipe inside wall. You will also learn how to prevent future leaks, perform DIY pipe repair, and safely handle pipe repair in wall issues.
Essential Tools for How to Fix a Burst Water Pipe in the Wall
Before attempting any repair, you need the essential tools for how to fix a burst water pipe in the wall. Having the right equipment ensures your work is safe, efficient, and effective. At a minimum, you should have a pipe cutter, adjustable wrench, pipe clamps, sealing tape, and a bucket to catch water. In case of an emergency, keep a basic home plumbing emergency kit handy, including gloves and a flashlight.
Knowing tools needed to fix wall pipe leak makes it easier to perform DIY pipe repair. Many homeowners panic when they find a wall pipe leak, but with the right tools, even a hidden pipe leak can be addressed quickly. Having clamps and sealants on hand allows for temporary fix for burst pipe inside wall while you plan a permanent solution. For example, one case study in a UK home showed that having a pipe clamp reduced water wastage and prevented further damage during repair.
Materials Needed for How to Fix a Burst Water Pipe in the Wall
To perform a reliable burst pipe repair, you need the proper materials. Replacement pipes, connectors, sealing tape, and epoxy putty are essential. Using high-quality materials reduces the risk of repeat leaks and ensures water pipe replacement lasts longer. You should also have cleaning supplies ready, as a clean pipe surface helps sealants and connectors adhere better.
If you are repairing a broken water pipe at home, selecting the right connectors and pipes is critical. Many homeowners attempt patching a wall pipe without demolition, but using subpar materials often leads to a new wall pipe leak. Investing in good-quality fittings and sealants allows for safe, professional-standard pipe repair in wall. A practical tip is to always keep a few spare connectors and tape rolls for any emergency repair for leaking wall pipe situations.
Step-by-Step Process for How to Fix a Burst Water Pipe in the Wall
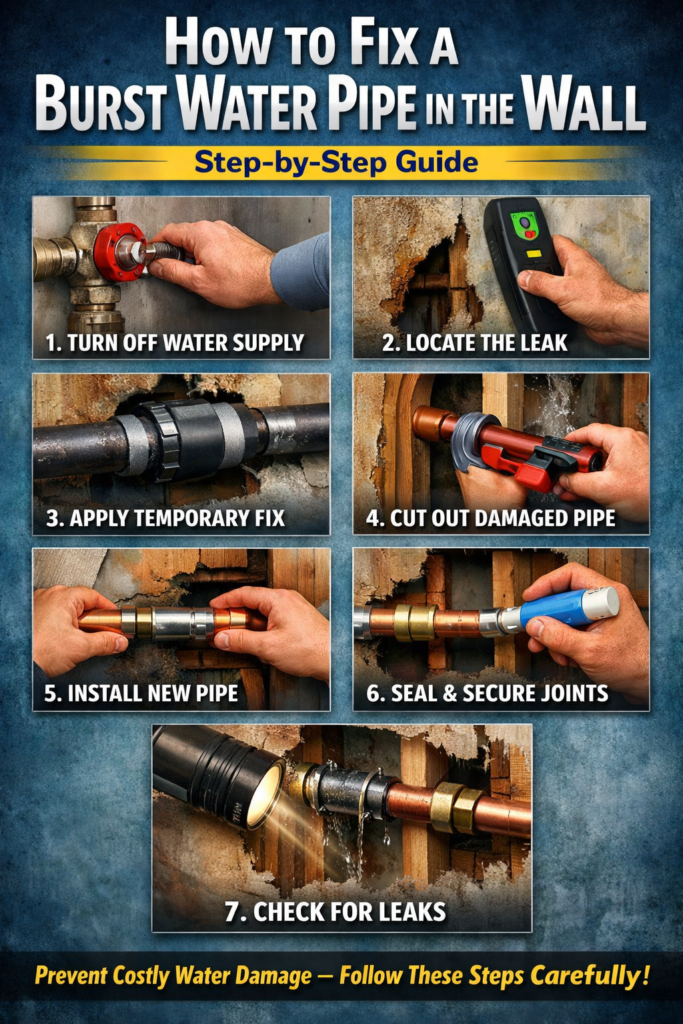
The process of fixing a burst water pipe in the wall starts with safety. First, turn off your main water supply to prevent flooding. Next, locate the hidden pipe leak using a flashlight or moisture detector. Once the leak is found, you can apply a temporary fix for burst pipe inside wall using clamps or sealing tape.
After the temporary repair, remove the damaged section carefully. Use a pipe cutter for precision, and install a new pipe section using connectors suitable for water pipe replacement. Secure all joints with sealant or epoxy. For DIY enthusiasts, following steps to repair a leaking wall pipe is essential to prevent mistakes. Always check for leaks by turning the water back on slowly and monitoring the repaired area. Applying a safe way to fix burst water pipe ensures longevity and reduces the risk of a repeat home plumbing emergency.
Common Mistakes to Avoid When Fixing a Burst Water Pipe in the Wall
Many homeowners make mistakes when attempting burst pipe repair. The most common errors include forgetting to turn off the main water supply, using improper connectors, and skipping cleaning the pipe surface before repair. These mistakes can worsen wall plumbing problems and even cause a hidden pipe leak to expand.
Another mistake is trying patching a wall pipe without demolition without knowing the pipe type. Old pipes may require proper repairing old pipes in walls techniques. Many also underestimate the value of having a DIY pipe repair kit ready for emergency pipe repair. One professional tip for wall pipe repair is to double-check all joints and seals and never rush the process. Avoiding these mistakes ensures your fix leaking pipes work is long-lasting and safe.
Preventing Future Damage After Fixing a Burst Water Pipe in the Wall
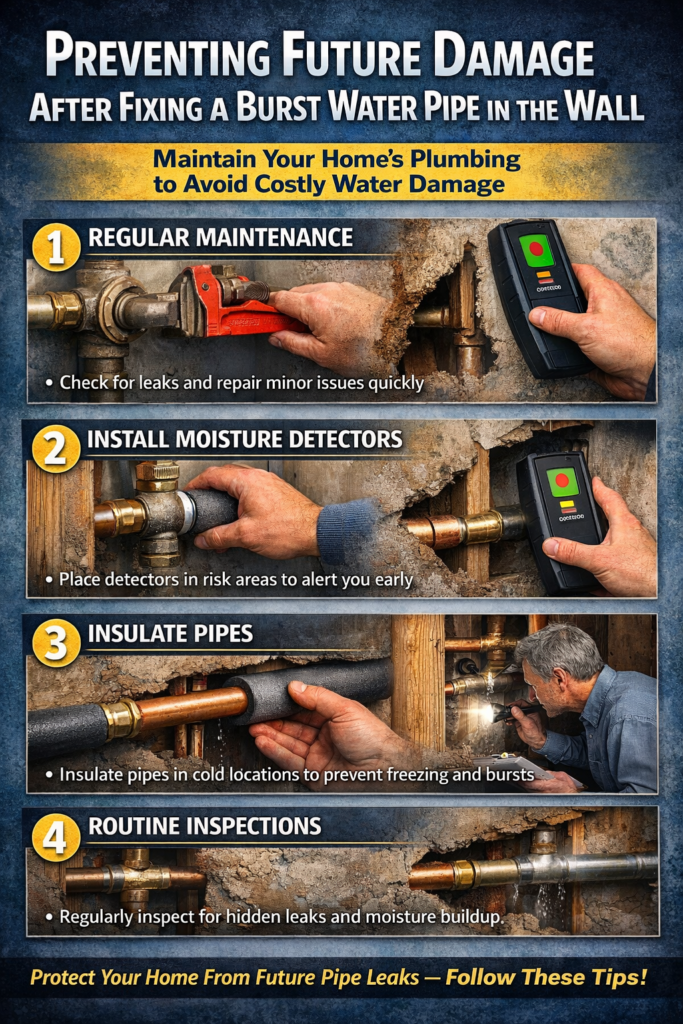
After completing your burst pipe repair, prevention is key. Conduct regular plumbing maintenance to catch early signs of wall pipe leak or hidden pipe leak. Installing moisture detectors in vulnerable areas helps prevent water damage before it spreads.
Homeowners should also consider insulating pipes, especially in cold climates, to prevent future bursts. Following professional tips for wall pipe repair, performing routine checks, and addressing minor leaks quickly reduces the likelihood of another home plumbing emergency. Proper upkeep allows for a proactive approach to preventing damage from wall pipe leaks, keeping your home safe and dry. In short, combining timely repair with ongoing maintenance is the best strategy to ensure you never have to worry about fixing a burst water pipe in the wall again.
FAQs
What should I do if water starts leaking inside my wall?
First, turn off the main water supply immediately. Use clamps or sealant to stop water leak temporarily before a proper repair.
How can I know where the leak is hiding?
Look for damp spots, peeling paint, or musty smells. A moisture detector helps locate a hidden pipe leak quickly.
Can I fix the pipe myself or call a plumber?
Small cracks can be handled with DIY pipe repair, but complex bursts need a professional pipe repair in wall to prevent further damage.
What tools do I need for a wall pipe leak?
Basic tools include a pipe cutter, wrench, clamps, and sealant. Having tools needed to fix wall pipe leak makes repairs faster and safer.
How long will a temporary fix last?
Temporary fixes like tape or clamps may last a few days. They prevent immediate flooding until a permanent burst pipe repair is done.
How can I prevent future leaks inside walls?
Regular plumbing maintenance and inspections help catch early signs of leaks. Proper insulation reduces chances of another wall pipe leak.
What’s the safest way to repair old pipes in walls?
Turn off water and clean the area first. Use quality connectors for repairing old pipes in walls to ensure a long-lasting fix.
Conclusion
Dealing with a burst water pipe in the wall can be stressful, but acting quickly makes all the difference. Knowing how to fix a burst water pipe in the wall with the right tools and materials prevents severe wall plumbing problems.
By following the step-by-step process for how to fix a burst water pipe in the wall, avoiding common mistakes, and using quality materials, you can complete pipe repair in wall efficiently. Even a hidden pipe leak can be fixed safely with a DIY pipe repair approach or temporary measures during a home plumbing emergency. Finally, remember that prevention matters. Regular plumbing maintenance, monitoring for leaks, and applying water damage prevention strategies ensures that fixing a burst water pipe in the wall becomes less stressful in the future. With the right preparation, you can protect your home and respond confidently to any emergency pipe repair situation.
Create a diy cozy gift basket with heartfelt treats, personal touches, and simple ideas that make every gift memorable and special.
How to Fix a Burst Water Pipe in the Wall How to Fix a Burst Water Pipe in the Wall How to Fix a Burst Water Pipe in the Wall How to Fix a Burst Water Pipe in the Wall How to Fix a Burst Water Pipe in the Wall How to Fix a Burst Water Pipe in the Wall How to Fix a Burst Water Pipe in the Wall How to Fix a Burst Water Pipe in the Wall How to Fix a Burst Water Pipe in the Wall How to Fix a Burst Water Pipe in the Wall How to Fix a Burst Water Pipe in the Wall